Tuesday, August 13, 2013
Well Hello Again....
So the summer is quickly coming to an end and I have many adventures to share with you soon! Sorry I have been away for so long. (I cannot believe my last post was in April!) I will be back soon and share more fun stuff. I hope your summer has been a great one! :)
Sunday, April 21, 2013
Join Me For a Blog Hop!
Happy Sunday, everyone! Today is an exciting day! Paper Issues has posted their newest issue: Serendipity. To celebrate, they are having a wonderful blog hop. I hope you will hop with me, starting here, to see all of the wonderful things the gals at Paper Issues have been up to!
 http://paperissues.blogspot.com/2013/04/its-serendipity.html
See you there!
P.S. I will be back soon to post photos of my latest layout, and will link up to the challenge, too! :)
http://paperissues.blogspot.com/2013/04/its-serendipity.html
See you there!
P.S. I will be back soon to post photos of my latest layout, and will link up to the challenge, too! :)
Wednesday, April 17, 2013
Good Morning! Time for a Challenge Entry! :)
Good morning, everyone! I hope your Wednesday is going well! I know mine is! Had a super day at work yesterday with a coworker of which I am quite fond and the sun is shining bright! Plus, I finished up my scrapbooking page for the Paper Issues Challenge! Would you like to see it? Here it is:
Beyond the details listed above, I just had fun playing with layers, colors, and patterns. And, of course, washi tape and gems! I hope you enjoy this page as much as I enjoyed making it! And, check out the challenge over at the Paper Issues Blog at http://www.paperissues.blogspot.com/2013/04/instalove.html. Happy Crafting! :)
 |
| Here is a picture of the whole page...I really like how it turned out, since this is my 2nd scrapbooking page with pictures EVER! (I made a book for my sister and niece, but without photos, and usually spend my time making cards.) I do not use Instagram, so I cropped a photo to 4"x4" and then mounted it on one of my favorite 6x6 papers so I could frame it with that little sentiment. :) |
 |
| Here is a close up of the corner. I made that little paper clip ribbon embellishment by wrapping ribbon around the clip. Then, I added a dragonfly which was stamped on acetate with black Staz On ink and a little hand cut heart. The bracket is hand cut to highlight the phrase "I love you." The border punch is one that I picked up quite awhile ago and cannot recall who makes it. Sorry! :) |
 |
| I am in love with the poppy stamp from Hero Arts, which I included in the bottom corner. To emphasize it, I stamped it with brown distress ink and water colored glimmer mist over the top to make it more subtle. I also glimmer mist painted the word "love" in the title, which is hard to see here. (Love that stuff! So shimmery and pretty!) |
 | ||
| This final image is of the poppies I embossed, paper pieced, and water colored with distress ink. (I also added a little bit of pink glimmer mist to finish them off). I love how they turned out with the colors in the photo! The grass is hand drawn, then embossed with the same embossing powder color I used on the stems of the poppy flowers. |
Sunday, April 14, 2013
April Birthday Cards!
Hello! Just dropping in to show you a few of the cards I completed this weekend. I have three birthdays coming up, including my Honey's brother's birthday this week and my Dad and brother's birthdays the following week. I am excited to share these with you and to send them out! I decided to make three cards using the same supplies, but different layouts. This is what I came up with:
I am also working on a layout for the Paper Issues current issue (which you can check out at www.paperissues.blogspot.com) and will post that as soon as I have it finished up. I have applied for their design team call, too, so wish me luck! :)
Thanks for stopping by! Have a wonderful week!!
 |
| Here is the first card I made. I started by dry embossing the star with one of my stencils and a pen. As I worked, I added stitching lines along the inside of the star and a solid blue line around the outside. I opted to use a little bit of sandpaper on the embossed edge, then retrace the embossing from the other side. The star edges started to tear, so I added distress ink and rolled the edges. I love the way this card turned out! :) |
 |
| Another view of the card, but with the tulip, too. (I am loving playing with our new camera and all the possibilities with the lighting and focus!) |
 |
| Here is the second card. (I love the reflection of the tulip in the back of this photo!) |
 |
| I used drops of shimmer mist at the top left corner, diagonally across the sentiment, and down on the bottom right corner to draw the eye across the card. |
 |
| Here is a close up of the twine, which I sprayed with shimmer mist and the gems I added at the bottom. There are also small drips of shimmer mist that I flung onto the card from the sprayer tube. |
 |
| Here is the third card. I decided it needed some shimmer mist after I had added all the other embellishment, so I dripped some on the corners, then blew on the mist to make it run. :) |
 |
| Here is a sideview. The little stars were cut from the patterned paper and put on pop dots. I highlighted two of them by tying twine around them. |
I am also working on a layout for the Paper Issues current issue (which you can check out at www.paperissues.blogspot.com) and will post that as soon as I have it finished up. I have applied for their design team call, too, so wish me luck! :)
Thanks for stopping by! Have a wonderful week!!
Saturday, March 30, 2013
Hello!
Good morning, everyone! Sorry it has been so long!! I haven't had my computer since it broke down (it is really old), but the Mr. is off on a field trip today, so I have his! :) Anywho, I apologize for the delay and wanted to follow up since I know I said I would tell you more about our new camera. Here it is!!


 We picked up the Canon PowerShot ELPH 110HS. It is awesome for point and shoot! It is a 16 megapixel camera and is most independent, setting the features and everything so the focus and lighting are all done for you. You can take pictures with manual settings as well, which we are still learning. The manual is fantastic for this! And, if you buy it from Costco you get the data card as well...a great deal! If you have time to check it out today it is still on sale! Otherwise, I did see that it is a great deal at Walmart, as well. :)
Here are some photos I have taken with the new camera of some craft projects most recently:
We picked up the Canon PowerShot ELPH 110HS. It is awesome for point and shoot! It is a 16 megapixel camera and is most independent, setting the features and everything so the focus and lighting are all done for you. You can take pictures with manual settings as well, which we are still learning. The manual is fantastic for this! And, if you buy it from Costco you get the data card as well...a great deal! If you have time to check it out today it is still on sale! Otherwise, I did see that it is a great deal at Walmart, as well. :)
Here are some photos I have taken with the new camera of some craft projects most recently:
 This first one is a birthday card for my mother in law. Her birthday is today. I hope she loves it! It was fun to make...I used a new stamp by Penny Black that I picked up at Paper Pals (just couldn't resist it), heat embossed it, and water colored with distress inks. It was fun to make. :)
 This one is an easter card for my parents. The background is distress ink, which I sponge on, then flicked water on. I dried it, stamped the image (Hero Arts, I believe), then added the eggs. They are just the letter "o" stamped onto shimmery vellum, then decorated with permanent marker doodles and cut out.
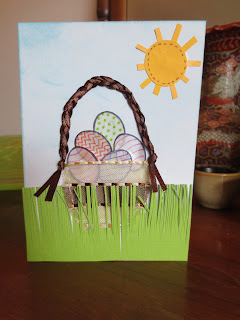 This final card is an easter card for my niece and sister. I made it more 3d and textured since I know that will be more fun for my niece. This one was easy, but fun to make. The basket is made of two pieces of ribbon which are sewn together by hand. The eggs are vellum, just like above, and the basket handle is braided ribbon. The grass is the fun part, as I can imagine my niece will think as well! :)
 Here is a close up of the texture of the card. Isn't that an awesome picture? It was all automatic with our awesome new camera! (Not only can you see the textures, you can also see the glue I managed to get all over! Ha!) :)
Hope your Saturday is a great one and that you enjoyed seeing the new pictures. If you have any questions about the camera, let me know! Thanks for stopping by! :)
Here is a close up of the texture of the card. Isn't that an awesome picture? It was all automatic with our awesome new camera! (Not only can you see the textures, you can also see the glue I managed to get all over! Ha!) :)
Hope your Saturday is a great one and that you enjoyed seeing the new pictures. If you have any questions about the camera, let me know! Thanks for stopping by! :)
Wednesday, March 20, 2013
Hello! (Update)
Good morning, everyone! Just wanted to drop in and say hello since I have been away for awhile. We had two losses in the family in the past month so I have spent some time with family and outside, trying to get my head screwed on straight again. :) I will be posting soon, though no pictures today...sorry! :) When I do post, though, you will get to see the pics from our new camera! It was on sale at Costco and we couldn't say no! I will let you know what it is so you can check it out, too. It is on special until the 30th of this month.
Thanks for stopping by! See you soon!! :)
Friday, March 1, 2013
Happy Friday! And a Question For You...
Good morning! Just wanted to write and say Happy Friday! I love Fridays! They mean freedom and craft time! :)
 {Thought this was a great Friday (and every day sentiment)...found it on the Two Peas In A Bucket Blog...Paige found it on a pinterest page. You can find the link to the Two Peas Blog on the right side of my blog on my blog list for more info! :) }
Anywho...I am also writing to get your input. I love to post pictures of the projects I make, but especially during the winter, have a hard time finding good light, so the colors in my pictures are always "off" or the details unclear. So, my question to you: Do you have an OTTLITE? What do you think of it? Does it help you take better pictures when you use it as a backlight? What are your thoughts? I would love to hear them! :)
Thanks in advance for any input you may have. It is much appreciated! :)
{Thought this was a great Friday (and every day sentiment)...found it on the Two Peas In A Bucket Blog...Paige found it on a pinterest page. You can find the link to the Two Peas Blog on the right side of my blog on my blog list for more info! :) }
Anywho...I am also writing to get your input. I love to post pictures of the projects I make, but especially during the winter, have a hard time finding good light, so the colors in my pictures are always "off" or the details unclear. So, my question to you: Do you have an OTTLITE? What do you think of it? Does it help you take better pictures when you use it as a backlight? What are your thoughts? I would love to hear them! :)
Thanks in advance for any input you may have. It is much appreciated! :)
Thursday, February 28, 2013
And More Cards!! :)
Happy Thursday! Here is the final post of cards from last weekend...Are you ready? One thing is for sure: I am ready for Friday! :) Enjoy!!
 This first card is a special one for two people I love and miss VERY MUCH...my sister and her daughter. I wanted to play with the look of chevrons, so I cut apart one of my Valentine's Day stamps-$1 from JoAnn Fabric-and got to work stamping Staz On ink onto a glitter laminate cardstock. Then, I layered it with a sentiment stamped on vellum, since I was clearly on a vellum kick this weekend. :) I like it! It is more CAS than I am used to, but I have been embracing this aspect of card making recently. :)
 This second card is for a friend I hold near and dear that lives in Boise. It is an inside joke of sorts, with that giant number 12 on it. Inside are some of the little things that go along with that number 12. :) It was fun to make.
Well, have a wonderful day! Hope you had fun checking these three days of cards out and got inspired! Thanks for all your love, support and inspiration! And, have a wonderful weekend...it is almost here! (Shriek of excitement!) :)
This second card is for a friend I hold near and dear that lives in Boise. It is an inside joke of sorts, with that giant number 12 on it. Inside are some of the little things that go along with that number 12. :) It was fun to make.
Well, have a wonderful day! Hope you had fun checking these three days of cards out and got inspired! Thanks for all your love, support and inspiration! And, have a wonderful weekend...it is almost here! (Shriek of excitement!) :)
Wednesday, February 27, 2013
More Cards.... :)
Good morning! Here are more of the cards I made this previous weekend, as promised. :)
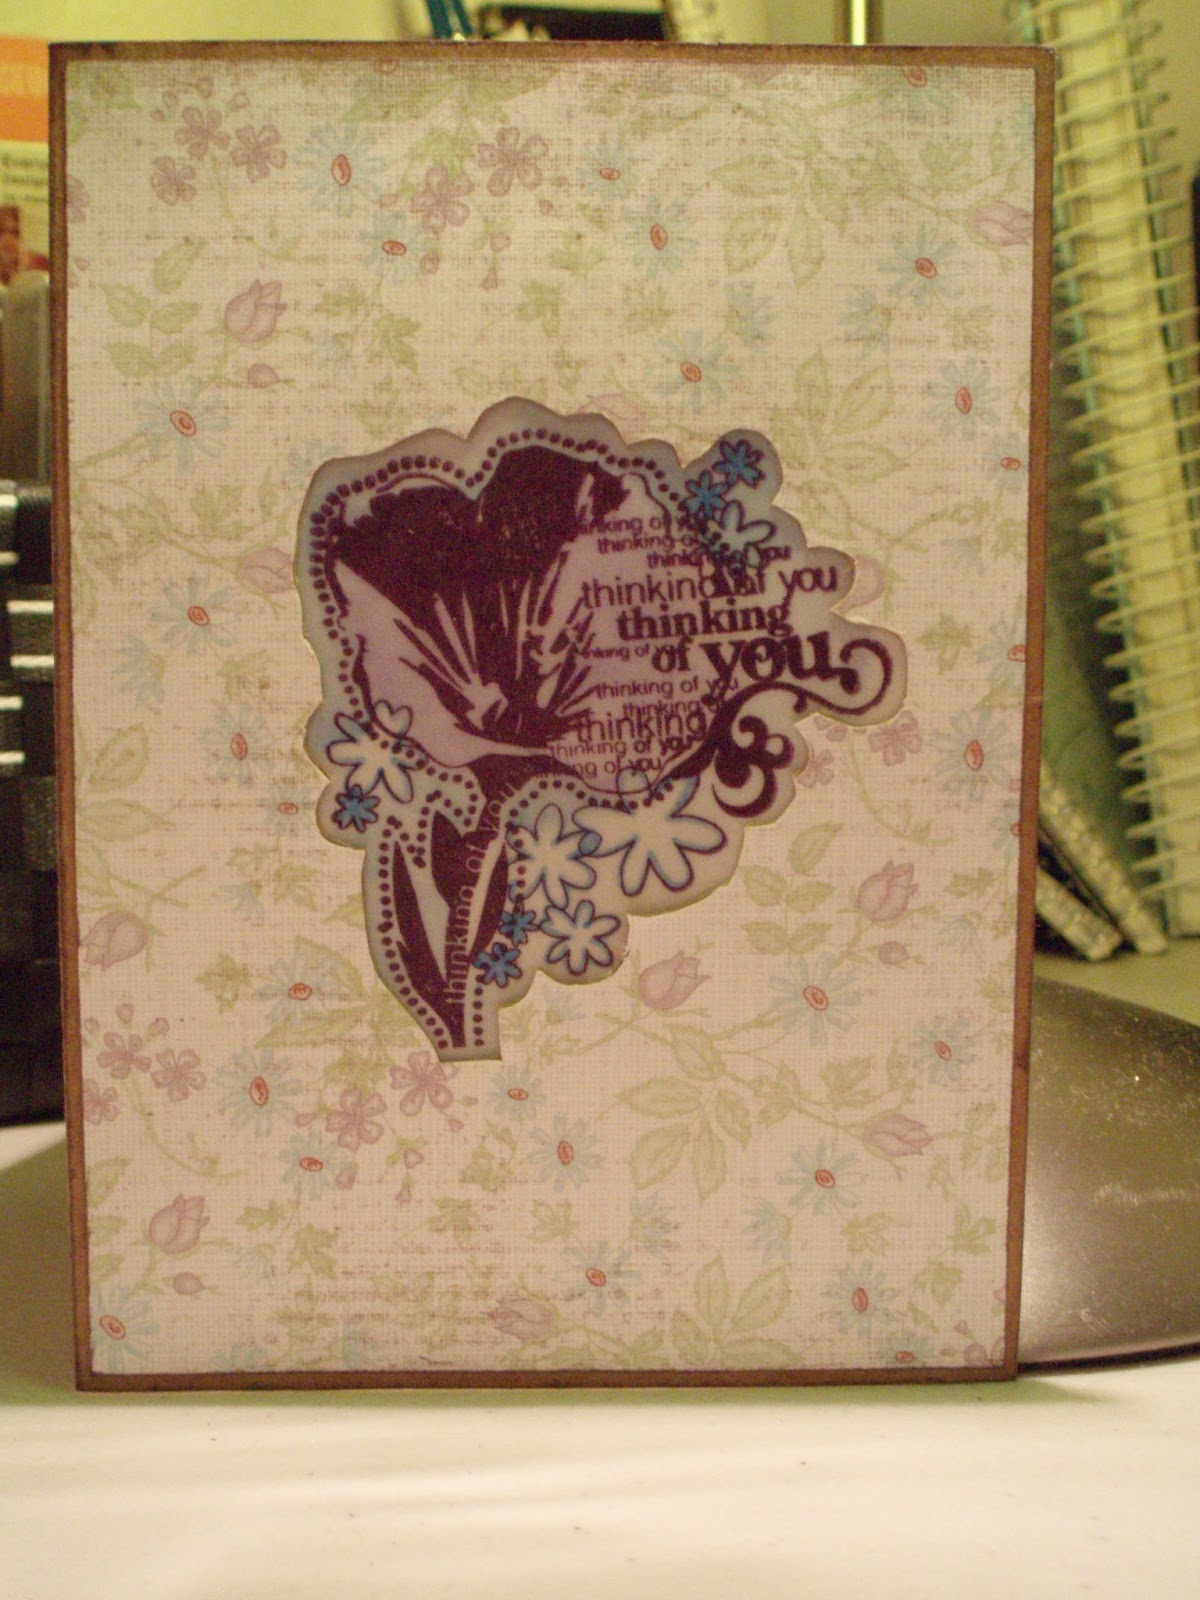
 This first card is for my mother, as I wanted to let her know I was thinking of her. I lost my last grandfather two Sundays ago, and wanted to send my condolences. The stamp is from a Stampendous set, I believe, and was done on vellum, then put into a window which is cut based on the shape of the stamp. I used permanent marker on the back side of the vellum to create the addition color background. I really like how it turned out.
 This second card is for my favorite uncle, who is in the hospital and not doing well. He has been in and out of ICU for several weeks. Another "thinking of you" card, as well as an I love you. The stamps are all Unity, with the exception of the key, which is a Tim Holtz stamp which came with a misting kit. Stamping is done in either Staz on Black or my shimmery Versamark. I really like the sentiment and the way it all came together, especially with the touch of the background.
Happy Wednesday, everyone! Hope your day is a beautiful one! :)
This second card is for my favorite uncle, who is in the hospital and not doing well. He has been in and out of ICU for several weeks. Another "thinking of you" card, as well as an I love you. The stamps are all Unity, with the exception of the key, which is a Tim Holtz stamp which came with a misting kit. Stamping is done in either Staz on Black or my shimmery Versamark. I really like the sentiment and the way it all came together, especially with the touch of the background.
Happy Wednesday, everyone! Hope your day is a beautiful one! :)
Tuesday, February 26, 2013
A Bunch of Cards :)
Good morning! Today I am posting a few cards from my weekend cardmaking project. I line with telling my loved ones how much I care, I made a bunch of cards to send out...eight to be exact. :) This post has 4 of the cards, which I am sending out today. Tomorrow and Thursday I will post the others, so stay tuned! :)
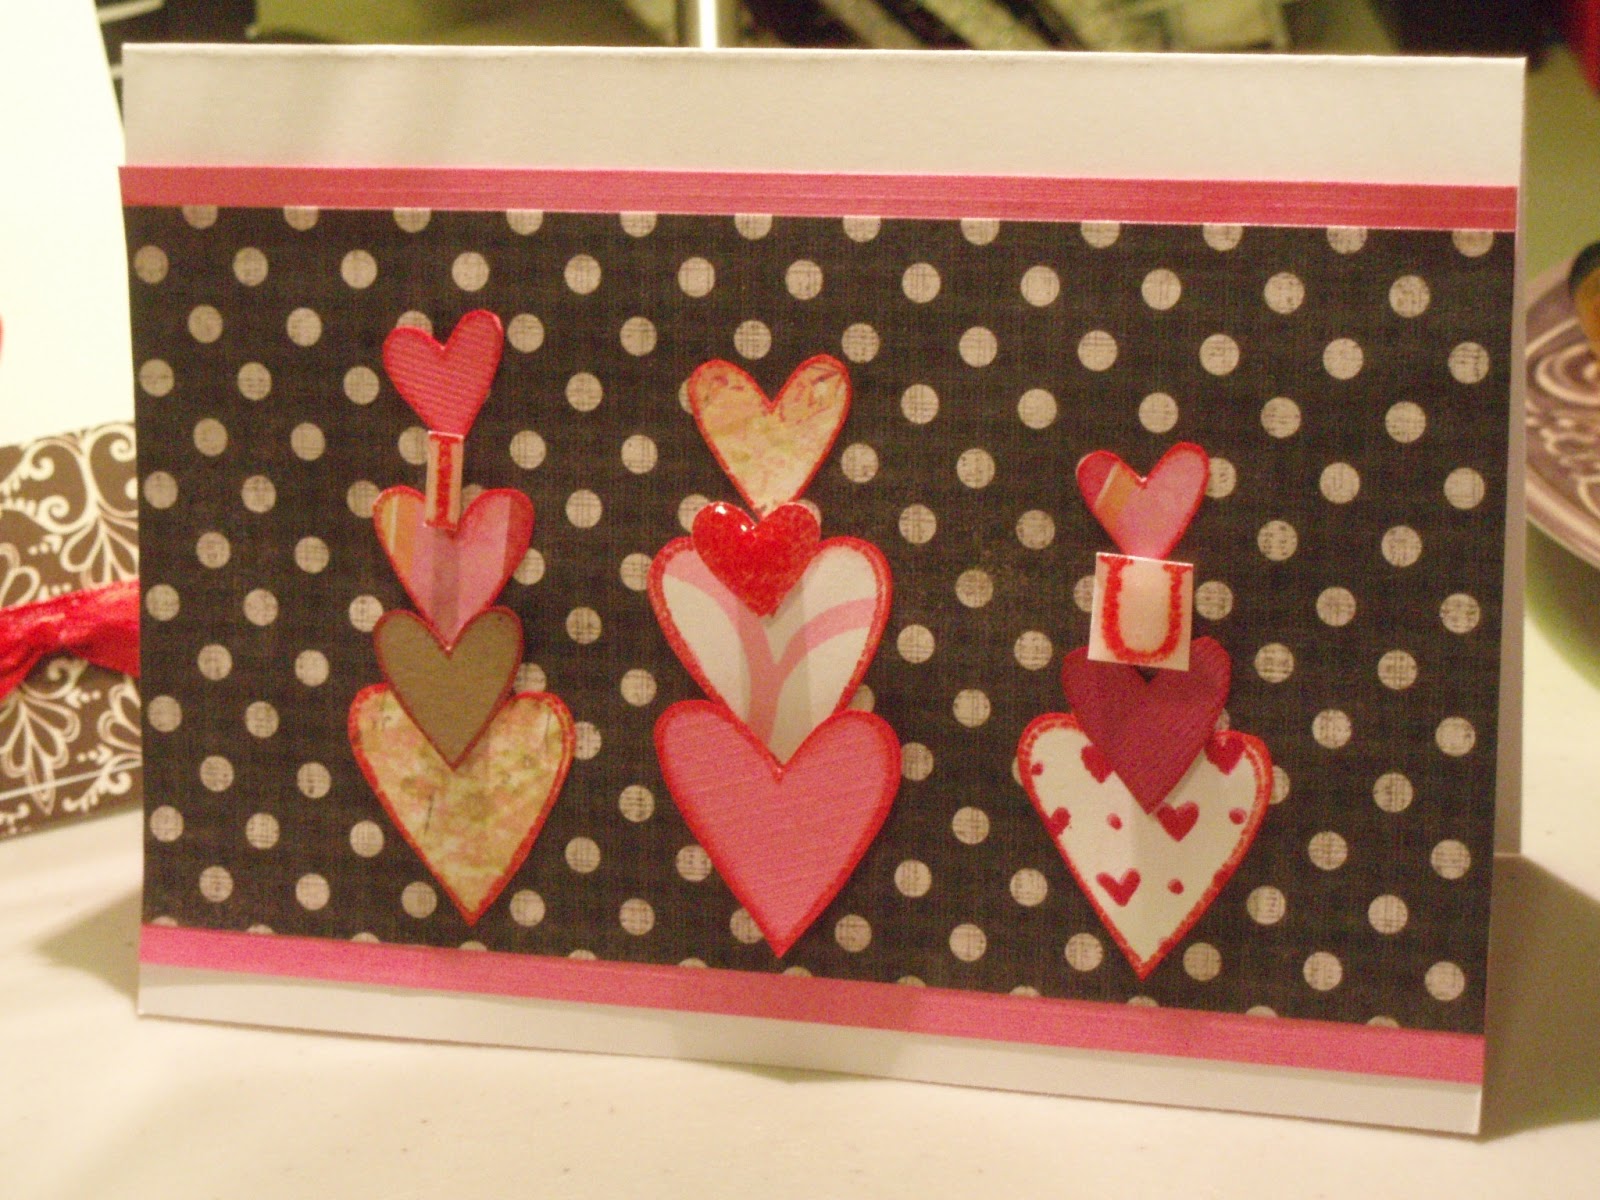
 This first card was inspired by an idea I had previously thought of...the original idea was to stack gifts, but with the recent Valentine's Day holiday, I thought it more fitting to stack the hearts. :)
 That idea got me thinking of how else I could use my heart cut outs...and this is what I came up with. I thought of tying the hearts with twine, but wanted the focus on the "I love you" message, so I stuck with clean and simple.
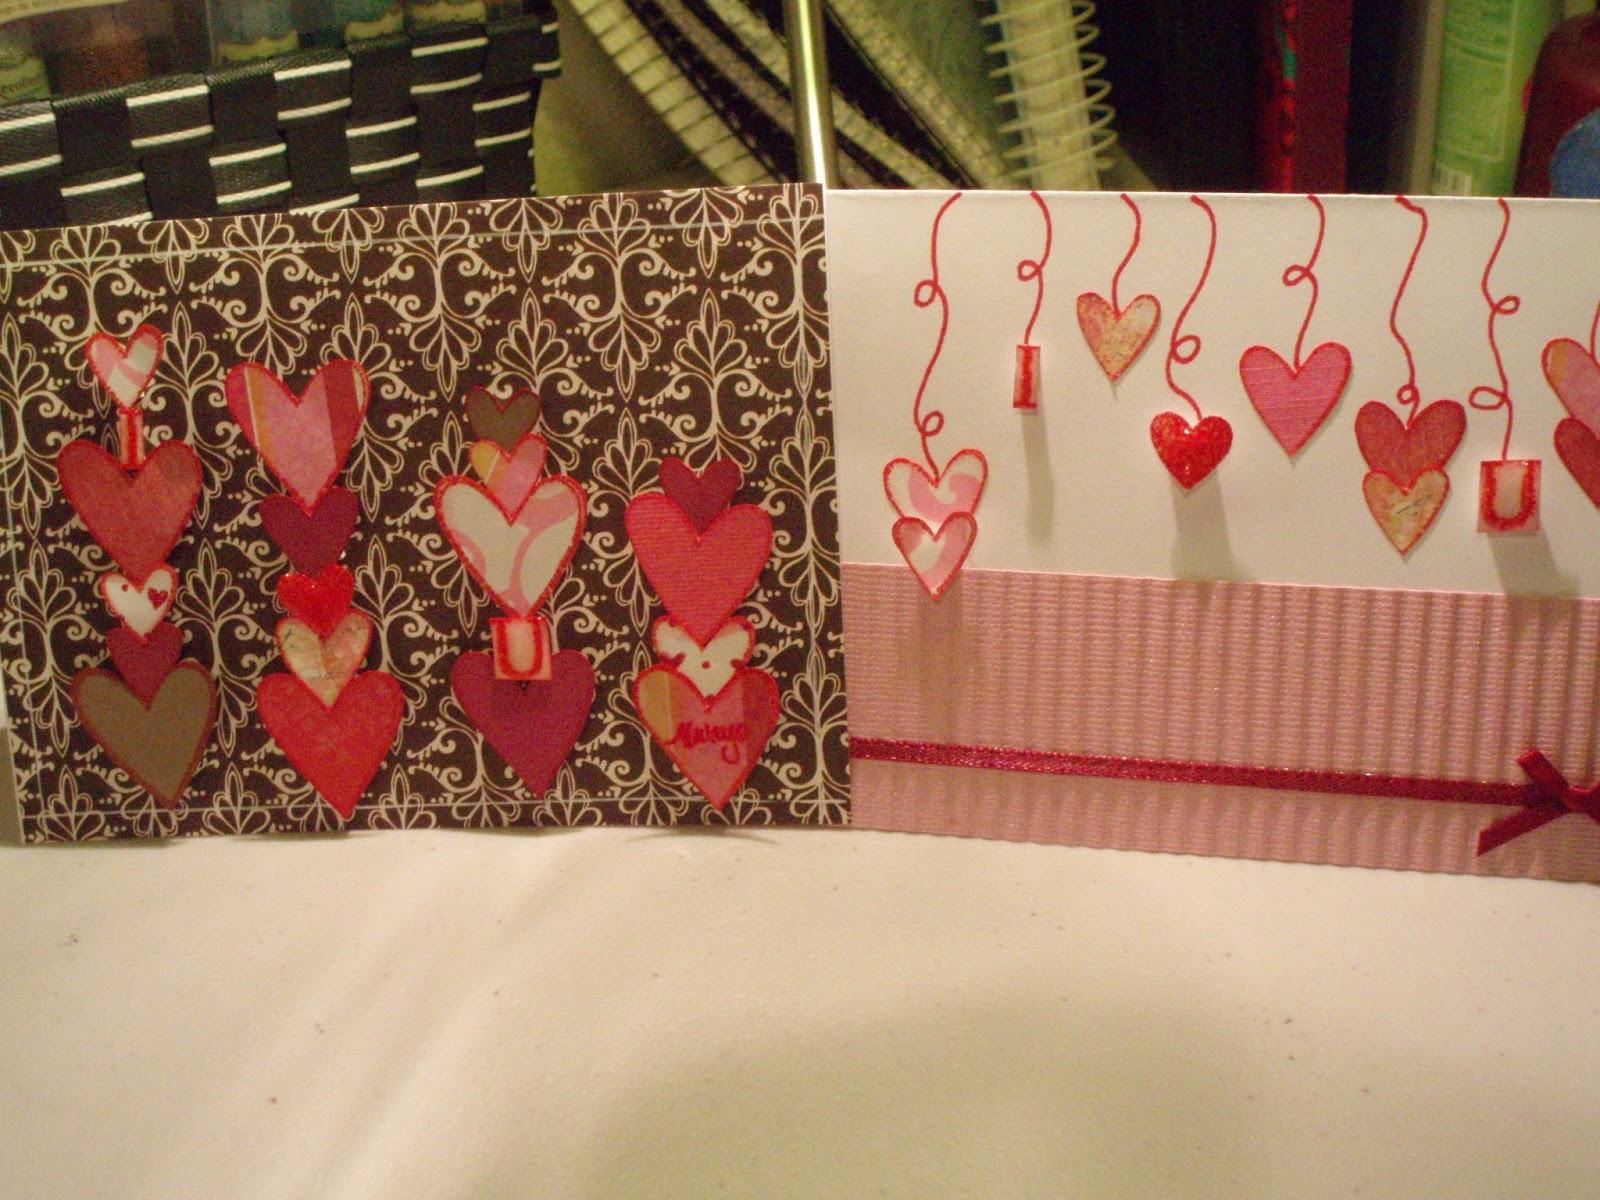
 This picture shows two more cards of similar design. I had fun with these! The hearts are stamps from a $1 stamp set from JoAnn Fabrics which is Valentine's Day themed. I stamped them on several scrap papers and cut them all out. Each of the "I <3 U" parts are highlighted with glossy accents to make them stand out. It is hard to see in the photos-Sorry! They look much cooler in real life! ;)
Hope you enjoyed! See you back tomorrow for more surprises! :)
This picture shows two more cards of similar design. I had fun with these! The hearts are stamps from a $1 stamp set from JoAnn Fabrics which is Valentine's Day themed. I stamped them on several scrap papers and cut them all out. Each of the "I <3 U" parts are highlighted with glossy accents to make them stand out. It is hard to see in the photos-Sorry! They look much cooler in real life! ;)
Hope you enjoyed! See you back tomorrow for more surprises! :)
 This first card was inspired by an idea I had previously thought of...the original idea was to stack gifts, but with the recent Valentine's Day holiday, I thought it more fitting to stack the hearts. :)
 That idea got me thinking of how else I could use my heart cut outs...and this is what I came up with. I thought of tying the hearts with twine, but wanted the focus on the "I love you" message, so I stuck with clean and simple.
 This picture shows two more cards of similar design. I had fun with these! The hearts are stamps from a $1 stamp set from JoAnn Fabrics which is Valentine's Day themed. I stamped them on several scrap papers and cut them all out. Each of the "I <3 U" parts are highlighted with glossy accents to make them stand out. It is hard to see in the photos-Sorry! They look much cooler in real life! ;)
Hope you enjoyed! See you back tomorrow for more surprises! :)
This picture shows two more cards of similar design. I had fun with these! The hearts are stamps from a $1 stamp set from JoAnn Fabrics which is Valentine's Day themed. I stamped them on several scrap papers and cut them all out. Each of the "I <3 U" parts are highlighted with glossy accents to make them stand out. It is hard to see in the photos-Sorry! They look much cooler in real life! ;)
Hope you enjoyed! See you back tomorrow for more surprises! :)
Sunday, February 24, 2013
An Update...
Hello! Sorry about the long delay in my posting. It has been busy here and there have been many things to ponder. I have been busy making cards again, and completed my first scrapbook layout, complete with pictures! :) I have also been working on a quilt for my beautiful Niece, who will be turning 1 in June. I am almost finished, so will have to post it to share soon. :) Here are a few of the cards I have made in the past month for birthdays and just because I was thinking of two women who I hold near and dear to my heart:
 This first card was for one of my Father's birthdays. I had a blast using brown paint and the green mesh from an avocado bag on this one. I also did a little bit of doodling. It is more free hand than I usually do, and was, excuse the pun, quite freeing indeed. The balloons and hat are all paper pieced.
 This card is for one of my Moms. She loves purple. I love working with purple, so this was fun, too. I have been exploring different card styles lately, really just creating what comes to mind. And, I have been really loving the simplicity and sophistication of tags. Thus, this card was created. Love the corrugated paper, too! The tool that does this is one of my personal favorites!!
 It is called a paper crimper. Very cheap to buy, yet lends a lot of texture to pages, cards, and other layouts. Fun stuff!
 This third one is a card for my Mom. Her favorite colors are cobalt blue and yellow, so I thought I would play with the colors and have a little bit of fun. It turned out to be quite the adventure. I was inspired to make the heart from a heart shaped puzzle I saw. I like the look the torn paper gave and spread some paint around with my paint brush on this one, too. I love the look of the paint, but am struggling with the amount of warp-age I get on my card stock. Any ideas? I saw someone who was dry ironing their card stock, then placing it onto a base for a scrapbook page. Maybe I will have to try that, but with the card base to hold it flat....let me know if you think of anything! :)
These last two cards are for my Sister and a dear friend. I was inspired by Martina McBride's song "She's a Butterfly" and wanted to send some love and inspiration their way. I really like how they both turned out. There are two layers of patterned paper, plus a distress white sheet, then a butterfly diecut, handwritten lyrics, and some raffia. I just love them!
This third one is a card for my Mom. Her favorite colors are cobalt blue and yellow, so I thought I would play with the colors and have a little bit of fun. It turned out to be quite the adventure. I was inspired to make the heart from a heart shaped puzzle I saw. I like the look the torn paper gave and spread some paint around with my paint brush on this one, too. I love the look of the paint, but am struggling with the amount of warp-age I get on my card stock. Any ideas? I saw someone who was dry ironing their card stock, then placing it onto a base for a scrapbook page. Maybe I will have to try that, but with the card base to hold it flat....let me know if you think of anything! :)
These last two cards are for my Sister and a dear friend. I was inspired by Martina McBride's song "She's a Butterfly" and wanted to send some love and inspiration their way. I really like how they both turned out. There are two layers of patterned paper, plus a distress white sheet, then a butterfly diecut, handwritten lyrics, and some raffia. I just love them!

 Sure hope you enjoyed these! I know I loved making them!! Let me know what you think and what your favorite style is right now. I would love to hear from you. :) Thanks for stopping by!
Oh, and since I am doing an update, I thought I should let you know that due to a recent chain of family events, I will not be selling cards. I decided that I would rather put all of that love and energy into telling the people in my life that I care about how much I love them. Life is short and I will take any opportunity I get to tell those I hold near and dear to my heart how important they are to me. :)
Sure hope you enjoyed these! I know I loved making them!! Let me know what you think and what your favorite style is right now. I would love to hear from you. :) Thanks for stopping by!
Oh, and since I am doing an update, I thought I should let you know that due to a recent chain of family events, I will not be selling cards. I decided that I would rather put all of that love and energy into telling the people in my life that I care about how much I love them. Life is short and I will take any opportunity I get to tell those I hold near and dear to my heart how important they are to me. :)
 This first card was for one of my Father's birthdays. I had a blast using brown paint and the green mesh from an avocado bag on this one. I also did a little bit of doodling. It is more free hand than I usually do, and was, excuse the pun, quite freeing indeed. The balloons and hat are all paper pieced.
 This card is for one of my Moms. She loves purple. I love working with purple, so this was fun, too. I have been exploring different card styles lately, really just creating what comes to mind. And, I have been really loving the simplicity and sophistication of tags. Thus, this card was created. Love the corrugated paper, too! The tool that does this is one of my personal favorites!!
 It is called a paper crimper. Very cheap to buy, yet lends a lot of texture to pages, cards, and other layouts. Fun stuff!
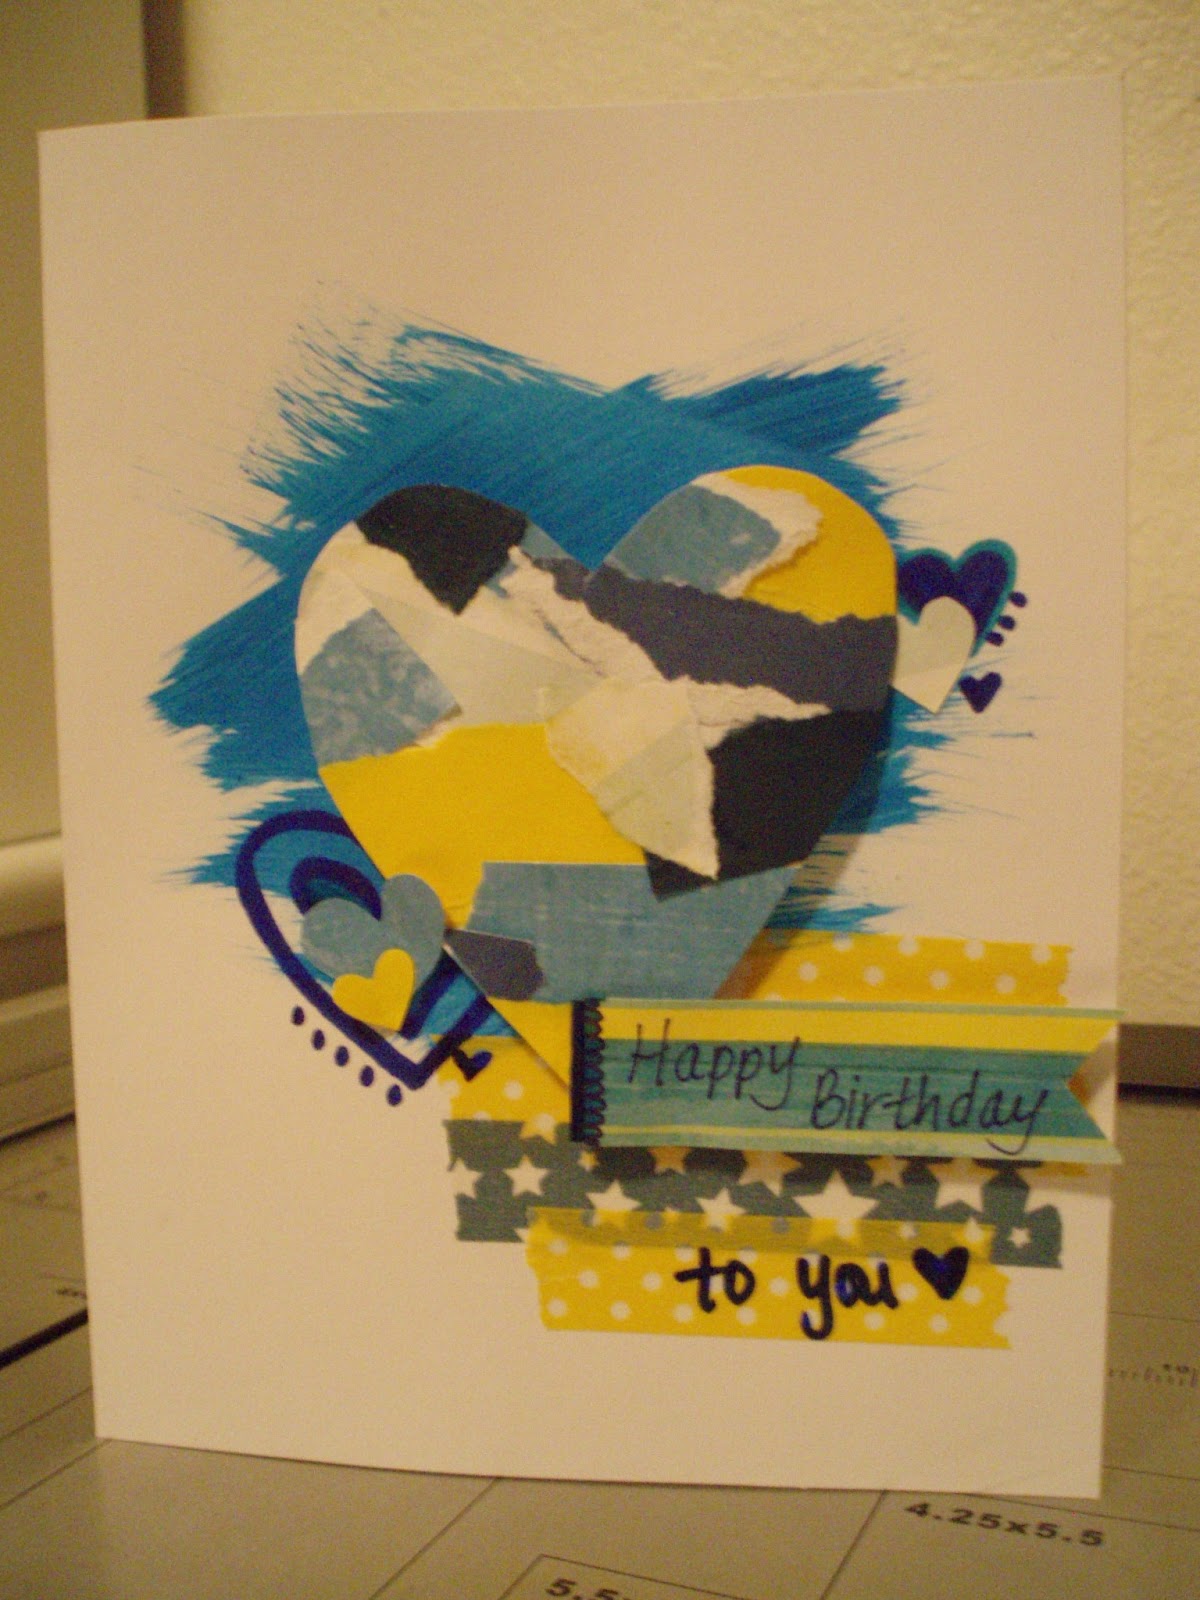 This third one is a card for my Mom. Her favorite colors are cobalt blue and yellow, so I thought I would play with the colors and have a little bit of fun. It turned out to be quite the adventure. I was inspired to make the heart from a heart shaped puzzle I saw. I like the look the torn paper gave and spread some paint around with my paint brush on this one, too. I love the look of the paint, but am struggling with the amount of warp-age I get on my card stock. Any ideas? I saw someone who was dry ironing their card stock, then placing it onto a base for a scrapbook page. Maybe I will have to try that, but with the card base to hold it flat....let me know if you think of anything! :)
These last two cards are for my Sister and a dear friend. I was inspired by Martina McBride's song "She's a Butterfly" and wanted to send some love and inspiration their way. I really like how they both turned out. There are two layers of patterned paper, plus a distress white sheet, then a butterfly diecut, handwritten lyrics, and some raffia. I just love them!
This third one is a card for my Mom. Her favorite colors are cobalt blue and yellow, so I thought I would play with the colors and have a little bit of fun. It turned out to be quite the adventure. I was inspired to make the heart from a heart shaped puzzle I saw. I like the look the torn paper gave and spread some paint around with my paint brush on this one, too. I love the look of the paint, but am struggling with the amount of warp-age I get on my card stock. Any ideas? I saw someone who was dry ironing their card stock, then placing it onto a base for a scrapbook page. Maybe I will have to try that, but with the card base to hold it flat....let me know if you think of anything! :)
These last two cards are for my Sister and a dear friend. I was inspired by Martina McBride's song "She's a Butterfly" and wanted to send some love and inspiration their way. I really like how they both turned out. There are two layers of patterned paper, plus a distress white sheet, then a butterfly diecut, handwritten lyrics, and some raffia. I just love them!

 Sure hope you enjoyed these! I know I loved making them!! Let me know what you think and what your favorite style is right now. I would love to hear from you. :) Thanks for stopping by!
Oh, and since I am doing an update, I thought I should let you know that due to a recent chain of family events, I will not be selling cards. I decided that I would rather put all of that love and energy into telling the people in my life that I care about how much I love them. Life is short and I will take any opportunity I get to tell those I hold near and dear to my heart how important they are to me. :)
Sure hope you enjoyed these! I know I loved making them!! Let me know what you think and what your favorite style is right now. I would love to hear from you. :) Thanks for stopping by!
Oh, and since I am doing an update, I thought I should let you know that due to a recent chain of family events, I will not be selling cards. I decided that I would rather put all of that love and energy into telling the people in my life that I care about how much I love them. Life is short and I will take any opportunity I get to tell those I hold near and dear to my heart how important they are to me. :)
Friday, February 1, 2013
Happy Friday Everyone!
Good morning! Just wanted to stop by and say Happy Friday to you all! I am just checking in here before I head to the gym to run and pump some iron. ;)
I hope it is a great day for you and that your weekend is wonderful! Thank you for stopping in! (Shooting for 600 page views today...wish me luck!)
 And, no, I am not that tan right now...I took this over the summer. Can't wait for the sun to come back! It is getting warmer... :)

Monday, January 28, 2013
Time For Another Hop!
Hello again! I am back, and look what I have found! (I am at home with a grumpy tummy if you are wondering how I have so much time today). There is a hop going on over at Simon Says Stamp!
 You can find the beginning of the hop here: http://simonsaysstampblog.blogspot.com/2013/01/simon-says-stamp-valentines-day-blog.html
Join me and hop along!! :) (You might even win a prize...)
You can find the beginning of the hop here: http://simonsaysstampblog.blogspot.com/2013/01/simon-says-stamp-valentines-day-blog.html
Join me and hop along!! :) (You might even win a prize...)

The Daily Marker Giveaway!

Snowy Monday
Hello and Happy Monday! It is snowy here...and plenty more on the way! Makes me happy to see the beautiful light of things and the peaceful, quiet, insulation of the snow. I do miss summer, though and am looking forward to many more adventures this year. Thought I would share more summer photos of our backpacking trips since I am missing the sun. :)
 Our hike into the wilderness led us through ankle deep mud. It had rained on the west coast for six days before our trip.
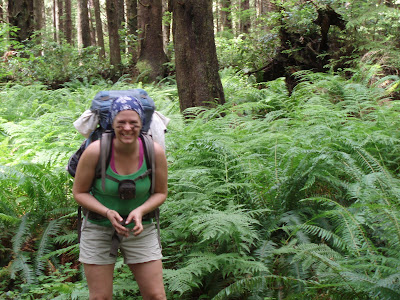 I was not about to let a little mud get me down and even had some fun with it! :)
 Trudging through the mud was worth it. Here is one of our views. There were many of these. I love to be outside, especially at the ocean!
 Here is our home for a week. Actually, quite sturdy and nice. There was one night we had a crazy storm with heavy rain and winds and had to guy out the tent. That was another fun adventure all its own!
 And here is the view from our temporary home. Gorgeous! :)
 Here are a couple of our resident neighbors. I love eagles! Isn't he so regal?
 We also had negative tides the whole trip, so we saw many creatures that ordinarily are hidden. I was in heaven!
Thanks for stopping by today! Have a wonderful Monday! :)
We also had negative tides the whole trip, so we saw many creatures that ordinarily are hidden. I was in heaven!
Thanks for stopping by today! Have a wonderful Monday! :)


Saturday, January 26, 2013
Favorite 2012 Project...And A Challenge At Paper Issues!
Hello, everyone! Happy Saturday! I am just stopping by to show you my favorite project from 2012. It was a tough choice, but I decided that this is near and dear to my heart.
 It is a card I shared previously on my blog, which I sent to my parents. It is made with multiple layers, including stamped images which are cut out, ribbon, acetate and paper layered butterflies, butterfly washi tape, a stamped background, and recycled avocado netting. I loved how it turned out and added the metal charms with hand written words in honor of the anniversary of my grandmother's passing. She was an amazing woman and taught me so much. She was always there for me and I hope that my presence in her life brought me as much joy, love, and peace as hers did (and still does) in mine. I miss her every day. I don't think anyone has ever known me so well and I cannot help but miss her beautiful face. So many fond memories, but, back to the card :) ....
 Here is a close up of the detail of the butterflies, too. I hope you enjoyed viewing this card as much as I loved making it! Let me know what you think!! :)
 I am posting this card on the Paper Issues blog, which you can find here: http://www.paperissues.blogspot.com/2013/01/my-favorite.html
There are so many talented women and beautiful projects to see. You should check it out! :)
Thanks for stopping by! Wish me luck! :)
I am posting this card on the Paper Issues blog, which you can find here: http://www.paperissues.blogspot.com/2013/01/my-favorite.html
There are so many talented women and beautiful projects to see. You should check it out! :)
Thanks for stopping by! Wish me luck! :)


Friday, January 25, 2013
Happy Friday-Golden Oldies Challenge Post! :)
Today I am sharing the card I made for the Golden oldies challenge over at A Blog Named Hero. I am sharing with you, then on my way to post it on their page before the last work day of the week! Hooray!
 So, here it is! I used four different Hero Arts stamp sets for this card, to follow the theme of using older stamps they have produced. It was fun to come up with! I used the "Poppy Background" cling stamp for the main portion of the card. I embossed it with Stampendous' Sapphire Pearlustre powder. Then, I colored it with distress ink in peeled paint and wild honey by Ranger. This layer is attached above a square border made from the old "Design Borders" stamp set. It is stamped in fired brick by Ranger. I also stamped the sentiment from another Hero Arts set, "Truly Appreciated". I used the wild honey distress ink to stamp it, then wrote over hello with a marker...not sure by who! :) Lastly, I added a tiny lady bug, also from Hero Arts, in the set called "Antique Engravings." The lady bug is stamped in black over barn door distress ink by Ranger. There is a close up here:
 Hope you like it! I sure had fun making it and trying a new combination of colors. I love the way the blue embossing powder and yellow look on the poppies! Oh, and there is a touch of fired brick on the poppies to make them go with the border in red. Such a fun card to make! Don't forget to hop on over to the A Blog Named Hero to check out the other entries or enter one of your own! It is here: ablognamedhero.blogspot.com
 Happy Friday everyone! :)


Thursday, January 24, 2013
Organization....

Subscribe to:
Posts (Atom)